
Redocly tutorial -- authoring and publishing API docs with Redocly's command-line tools
Redocly provides a variety of tools for working with API docs. Using Redocly’s command-line tools, you can split the OpenAPI definition into many sub-files, and then later bundle up the discrete files into a single file during the publishing stage. You can generate your docs into one of the most attractive outputs available for REST API docs, including integration with conceptual topics as well. Redocly also offers more robust developer portals and SaaS offerings that cover the full authoring and publishing lifecycle.
- Background about Redocly’s approach to simplifying the author experience with OpenAPI
- Overview of Redocly products
- Redocly CLI Walkthrough tutorial
- 1. Install the prerequisites
- 2. Break up an OpenAPI file
- 3. Check your OpenAPI definition against rules
- 4. Preview the Redoc output
- 5. Bundle up the OpenAPI definition into a single file
- 6. Combine conceptual docs with reference docs
- 7. Explore the premium version: Redocly API Reference
- 8. Publish the reference output
- Conclusion
Note that Redocly is one of the sponsors of my site.
Background about Redocly’s approach to simplifying the author experience with OpenAPI
Before Redocly became Redocly, the team worked on a product called Rebilly that included a 22,000 line OpenAPI definition file. Working in such a long file and authoring in YAML or JSON was especially challenging. Not only was maneuvering in a single massive file difficult, one small indentation error would require them to constantly troubleshoot syntax issues. (The single YAML file for all OpenAPI definition elements was analogous to software developers storing all code for an application in a single file — an unthinkable way of working with code.)
When Redocly innovated on their approach to simplifying OpenAPI spec development, instead of putting a graphical user interface (GUI) on top of the OpenAPI code and requiring users to write the OpenAPI definition in forms, menus, and other widgets, Redocly decided on a more docs-as-code approach that aligns with the developer audience.
Redocly developed command-line tools to split the OpenAPI definition into smaller files to make it easier to work with. Files are stored as separate files and referenced through JSON reference tag ($ref) in the main OpenAPI file. Working in smaller files reduces the likelihood of syntax issues and other formatting errors. It also makes it easier to focus on the content.
The CLI tools also let you check your OpenAPI definition against a ruleset to ensure you’re following best practices. You can configure the ruleset with different levels of strictness, either including or ignoring optional best practices in the OpenAPI specification. This linting lets you identify issues in your OpenAPI definition that might not technically be errors, but would better if included.
When you’re ready to publish your OpenAPI definition, you can also use a command line tool to bundle the small files up into a single file again. You can then feed your OpenAPI definition file into any OpenAPI documentation tool, including Redoc’s documentation output: Redocly API Reference (premium version), or the community edition of Redoc (free version). There’s also a Developer Portal option, or a more cloud-based Workflows integration. Some of these tools (especially the command-line tools) will come into focus through the tutorial below.
Overview of Redocly products
Redocly has a variety of products, so let’s first clarify these tools before diving more deeply into the the tutorial.
| Tool | Description | Cost |
|---|---|---|
| Redoc | The API reference documentation output generated from the OpenAPI definition. Compare Redoc with Swagger UI or other document generators that parse through an OpenAPI file and render documentation. The free version has limited functionality. | Free |
| API Docs | The premium version of Redoc – the API docs output from the OpenAPI definition file. This premium version includes Try-it functionality, enhanced search, fast loading, special tags, and other features. You can also compare the difference between Redoc and Redocly here. | Premium |
create-openapi-repo |
CLI tool for splitting a single OpenAPI definition file into multiple files. You can also use this CLI tool to start a new API definition. | Free |
redocly-cli |
CLI tool that provides linting against a customizable ruleset, as well as bundling of the OpenAPI files into a single file. You can also preview the output of your docs with the Redocly API Reference through this tool. | Free |
| Developer Portal | A sample starter developer portal, built on top of Gatsby. Intended for more robust documentation scenarios. See Developer portal: Introduction for the Redocly documentation, and developer-portal-starter for some of the code. |
Premium |
| Workflows | An online Redocly app that provides the full authoring and publishing toolset in the cloud, with GitHub integration and docs-as-code workflows. See https://app.redoc.ly | Premium |
This article will focus mostly on the authoring experience working with the OpenAPI definition (using create-openapi-repo and redocly-cli), as well as publishing using Redoc. For more details about Redocly’s Developer Portal and Workflows product, see the Products menu on Redocly’s site.
Redocly CLI Walkthrough tutorial
This tutorial will give you a sense of how the Redocly CLI tools work and how to publish the OpenAPI using Redoc. You’ll break up an OpenAPI file, make some changes, bundle it back up, and then publish it with Redoc. The tutorial has the following sections:
- 1. Install the prerequisites
- 2. Break up an OpenAPI file
- 3. Check your OpenAPI definition against rules
- 4. Preview the Redoc output
- 5. Bundle up the OpenAPI definition into a single file
- 6. Combine conceptual docs with reference docs
- 7. Explore the premium version: Redocly API Reference
- 8. Publish the reference output)
The sections aren’t necessarily sequential, but they proceed through Redocly’s tools in a logical way to become familiar with different aspects of the products. Also, the tutorial uses a sample OpenAPI definition related to the OpenWeatherMap API (used elsewhere in the course). Also, the instructions were written using a Mac. There might not be any differences with Windows, but note that Windows wasn’t used here.
This tutorial is a brief exposure to Redocly’s tools only. For more comprehensive documentation, see Redocly’s documentation.
1. Install the prerequisites
Before you can work with the Redocly CLI tools, you need to install them. node.js is a prerequisite to installing both Redocly CLI tools.
-
Install
create-openapi-repofollowing the instructions in How to generate your repository.“npx” is the npm package runner and is the recommended way of running packages that you would run occasionally (see Downloading and installing packages globally). Redocly recommends using npx when installing the
create-openapi-repobecause it’s typically used only once. - Install
openapi-clifollowing the instructions here: Installation. - After you finish installing these CLI tools, restart your terminal.
- Check that your terminal recognizes the
create-openapi-repoandopenapi-clicommands.
2. Break up an OpenAPI file
In this step, you’ll break up an existing OpenAPI file into smaller files. We’ll use a sample OpenAPI file that we’ve been using in other places in this course.
-
Download the openapi_openweathermap.yml file.
Right-click the file and choose Save Link As. Save it in a folder called
redocly_projectin a convenient location. This OpenAPI definition is a small OpenAPI 3.0 file for one API in the OpenWeatherMap API. Note that you can use another OpenAPI definition in this tutorial if you prefer. There’s nothing special about this file — it just gives us an OpenAPI definition to work with. -
Open a terminal, browse to your
redocly_projectdirectory, and type the following:create-openapi-repoThe CLI asks, “Do you already have an OpenAPI/Swagger 3.0 definition for your API? (y/N)”
-
Type y and press return.
The CLI asks, “Please specify the path to the OpenAPI definition (local file):”
-
Type
openapi_openweathermap.ymland press return.The CLI asks, “API Name: (OpenWeatherMap API).”
-
Press return.
The CLI asks, “The following folders will be created: openapi and docs. You can change them by running
create-openapi-repo <openapiDir> <docsDir>Proceed? (Y/n)” -
Type Y and press return.
The CLI breaks up your OpenAPI file into smaller files inside an
openapifile. Redocly also installs adds somenode_modulesfolders and initializes a git repository. -
In a text editor (such as VS Code, Atom, or Sublime Text), open the
redocly_projectfolder and browse the contents.The folder structure looks like this:
└── redocly_project
    ├── .git ...
    ├── .redocly
    ├── LICENSE
    ├── node_modules ...
    ├── README.md
    ├── docs
    │   ├── favicon.png
    │   └── index.html
    ├── openapi
    │   ├── README.md
    │   ├── components
    │   │   ├── README.md
    │   │   ├── parameters
    │   │   │   ├── id.yaml
    │   │   │   ├── lang.yaml
    │   │   │   ├── lat.yaml
    │   │   │   ├── lon.yaml
    │   │   │   ├── mode.yaml
    │   │   │   ├── q.yaml
    │   │   │   ├── units.yaml
    │   │   │   └── zip.yaml
    │   │   ├── schemas
    │   │   │   ├── 200.yaml
    │   │   │   ├── Clouds.yaml
    │   │   │   ├── Coord.yaml
    │   │   │   ├── Main.yaml
    │   │   │   ├── Rain.yaml
    │   │   │   ├── Snow.yaml
    │   │   │   ├── Sys.yaml
    │   │   │   ├── Weather.yaml
    │   │   │   └── Wind.yaml
    │   │   └── securitySchemes
    │   │       └── app_id.yaml
    │   ├── openapi.yaml
    │   └── paths
    │       ├── README.md
    │       └── weather.yaml
    ├── openapi_openweathermap.yml
    ├── package-lock.json
    └── package.json
The original OpenAPI definition remains the same:
openapi_openweathermap.yml. Redocly has extracted each of the paths, parameters, components, and other elements into individual files inside theopenapifolder.Redocly creates a new OpenAPI definition file at
openapi/openapi.yaml. This OpenAPI definition contains references to all of the files that it extracted as external files. If you view thisopenapi.yamlfile, you’ll see that Redocly has separated out paths with external JSON references ($ref), such as the following:paths: /weather: $ref: paths/weather.yamlThe
weatherpath is now stored inopenapi/paths/weather.yaml. When you open thisweather.yamlfile, you’ll see that its parameters are also stored in external files:parameters: - $ref: ../components/parameters/q.yaml - $ref: ../components/parameters/id.yaml - $ref: ../components/parameters/lat.yaml - $ref: ../components/parameters/lon.yaml - $ref: ../components/parameters/zip.yaml - $ref: ../components/parameters/units.yaml - $ref: ../components/parameters/lang.yaml - $ref: ../components/parameters/mode.yamlThe OpenAPI definition allows for breaking up files like this and referencing the external files with
$ref.Note that
../refers to another file, whereas#/refers to another section on the same page (such as with references tocomponents).Although the
$refsyntax is standard, most tools don’t work well with OpenAPI files separated out. Usually, when you want to generate API documentation, you’ll need to feed the preferred API documentation generator a single OpenAPI YAML or JSON file, not a folder of separate files. But when your working on the API definition, it’s helpful to separate files to more easily work with the content.In this OpenAPI scenario, there’s just one simple path:
weather. However, suppose you had a slash, such asweather/surfingor something similar. In that case, because/is an illegal character in file names, Redocly would store this asweather@surfingunder thepathsfolder. Forward slashes (/) become@symbols.Additionally, if you had a path parameter, such as
weather/{beach_id}, Redocly uses curly braces{}to denote path parameters (rather than a colon:which is sometimes used).See the
README.mdin theopenapifolder for more details on these conventions. These conventions are recommendations only. You can decide how you reference the paths fromopenapi.yaml.
3. Check your OpenAPI definition against rules
Redocly lets you run a linter against your OpenAPI definition to check for best practices. In this step, you’ll break some rules, run the linter, and see the warnings displayed.
-
Open the
.redocly.yamlfile (inside the root directory) to see Redocly’s configuration details, including the linting rulesets, themes, and OpenAPI file used:apiDefinitions: main: openapi/openapi.yaml lint: extends: - recommended rules: no-unused-components: warning referenceDocs: htmlTemplate: ./docs/index.html theme: colors: primary: main: "#32329f"See Configuration file for details about each of these fields. Notice that
mainreferences the OpenAPI definition file. You could list multiple OpenAPI definitions here. Underlint, therecommendedruleset is specified.You can customize how strict the linting rules are, whether to ignore some rules, and make other configurations. For example, the recommended rules check that you follow best practices for completing the information (even if it’s optional in the spec) because this information leads to a better output when you generate the Redoc output. You will see warnings if you’re missing a
contactobject underinfo, if you’re missing adescriptionfortags, if you’re missingdescriptionproperties for eachparameter, and so on. You can learn more about the linting rules here: Rules. -
In a terminal prompt,
cdto yourredocly_projectfolder. -
Run the linter:
redocly lintBy default, all OpenAPI files listed in your
.redocly.yamlfile’sapiDefinitionsobject will be used. These are the command’sentrypoints. For example, although you just typedopenapi lint, the command fills in the implied defaults as follows:redocly lint main openapi/openapi.yamlHere’s the response when the linter finds that your OpenAPI definition is valid:
validating /Users/tomjohnson/projects/redocly_project/openapi/openapi.yaml... /Users/tomjohnson/projects/redocly_project/openapi/openapi.yaml: validated in in 35ms Woohoo! Your OpenAPI definition is valid. -
To see a generated warning, let’s violate some best practices. Open your
openapi/openapi.yamlfile and remove thelicenseobject:license: name: CC Attribution-ShareAlike 4.0 (CC BY-SA 4.0) url: 'https://openweathermap.org/price'Then save the file.
-
Now run the
openapi lintcommand again, and this time you’ll see that Redocly identifies a missing license and provides recommendations:validating /Users/tomjohnson/projects/redocly_project/openapi/openapi.yaml... [1] openapi/openapi.yaml:3:3 at #/info Info object should contain `license` field. 1 | openapi: 3.0.2 2 | info: 3 | title: OpenWeatherMap API 4 | description: >- … | < 14 more lines > 19 | email: [email protected] 20 | servers: 21 | - url: 'https://api.openweathermap.org/data/2.5' Warning was generated by the info-license rule. /Users/tomjohnson/projects/redocly_project/openapi/openapi.yaml: validated in in 126ms Woohoo! Your OpenAPI definition is valid. 🎉 You have 1 warning.
As your OpenAPI file gets larger and more complex, having a linter to check the definitions against a ruleset can be highly valuable.
(Before continuing on, restore the license object in the openapi.yaml file that you previously removed.)
4. Preview the Redoc output
The CLI contains a Redoc documentation preview server that listens for changes and rebuilds when it detects a change. To run the preview server:
-
Type the following command:
redocly preview-docsThe response is as follows:
Using Redoc community edition.
Login with openapi-cli login or use an enterprise license key to preview with the premium docs.


  🔎  Preview server running at http://127.0.0.1:8080

Bundling...


  👀  Watching /Users/tomjohnson/projects/redocly_project/openapi/openapi.yaml and all related resources for changes

Created a bundle for /Users/tomjohnson/projects/redocly_project/openapi/openapi.yaml successfully
GET /: 43.289ms
GET /hot.js: 22.313ms
GET /simplewebsocket.min.js: 34.003ms
GET /openapi.json: 0.507ms
GET /favicon.png: 1.720ms
Redoc bundles up your individual files into a single OpenAPI definition and passes it into the Redoc documentation generator. By default, you’re using the community edition of Redoc, which lacks some of the features of the pro version. (The differences are explained in more detail later in this section and also in 7. Explore the premium version: Redocly API Reference.)
-
Go to
http://127.0.0.1:8080in your browser to see a preview of the output: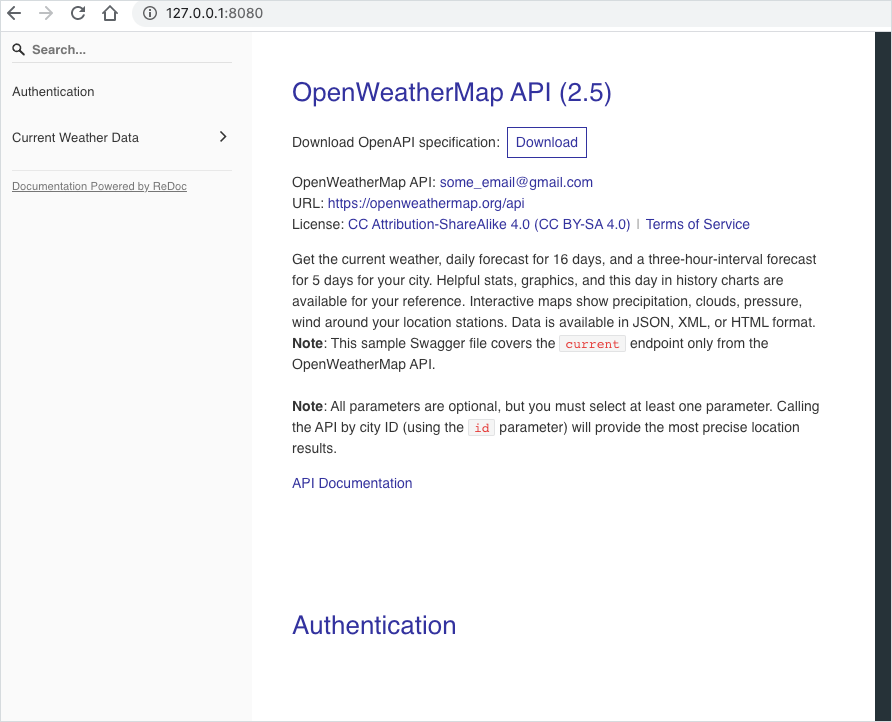
-
To see the auto-regeneration, go into one of your files in
openapiand make a change. For example go toopenapi/components/parameters/lat.yamland change a line in the description, and then save the file.The preview server rebuilds the output and reloads the page.
-
Press Ctrl+C to stop the preview server.
Note that we’re currently using the Community Edition of Redoc. We’ll explore more features in the Pro version in 7. Explore the premium version: Redocly API Reference.
5. Bundle up the OpenAPI definition into a single file
Let’s bundle the separate files into a single OpenAPI definition file. You might want to do this if you’re done working with your file and want to generate out the output to feed into another tool to render the documentation. To bundle up the OpenAPI files:
-
Run the following command:
redocly bundle main -o dist.jsonmainrefers to the OpenAPI definition you want bundled, as specified in your.redocly.yamlfile’sapiDefinitionsobject. The-o dist.jsonspecifies the output file. After running the command, you see the following:bundling openapi/openapi.yaml... 📦 Created a bundle for openapi/openapi.yaml at dist.json in 38ms. -
Open
dist.jsonto see that it contains all the references packaged into a single file.
Now let’s dive into some more features related to the authoring experience: how to integrate conceptual docs with reference docs.
6. Combine conceptual docs with reference docs
One common question in writing API tech docs is how to combine conceptual docs (e.g., getting started tutorials, information about authorization, troubleshooting, etc.) with the reference docs. Most API documentation generators generate reference docs only.
Redocly has some unique offerings when it comes to organizing and working with conceptual content. One integration strategy is to put all of your conceptual information into the description field of your info object, and then store that description content in an external file. Any heading 1 and 2 tags (# and ##) in your description will become separate entries in the sidebar. Let’s walk through this.
-
In our sample redocly project, open
openapi.yamland change thedescriptionto a$refpointing to a separate Markdown file. Specifically, identify this section:openapi: 3.0.2 info: title: OpenWeatherMap API description: >- Get the current weather, daily forecast for 16 days, and a three-hour-interval forecast for 5 days for your city. Helpful stats, graphics, and this day in history charts are available for your reference. Interactive maps show precipitation, clouds, pressure, wind around your location stations. Data is available in JSON, XML, or HTML format. **Note**: This sample Swagger file covers the `current` endpoint only from the OpenWeatherMap API. <br/><br/> **Note**: All parameters are optional, but you must select at least one parameter. Calling the API by city ID (using the `id` parameter) will provide the most precise location results.And change it to this:
openapi: 3.0.2
info:
  title: OpenWeatherMap API
  description:
  $ref: description.md
Note that
$ref: description.mdis technically incorrect with the OpenAPI spec, but the Redocly bundle process places that Markdown inline to correct it.For more detail on using
$ref, see Using JSON references ($refs). - Create a file called
description.mdunder theopenapifolder and paste the description content there. -
Run the preview server:
redocly preview-docs - Go to http://127.0.0.1:8080. The description appears the same as before, but it’s now a bit easier to work with because it’s in a standalone file. You don’t have worry about maintaining proper indentation in YAML. You can write more freely. As with the OpenAPI spec, the Markdown flavor supported is Commonmark Markdown.
-
In your
description.mdfile, add some heading tags, like this:# Overview Get the current weather, daily forecast for 16 days, and a three-hour-interval forecast for 5 days for your city. ## Graphics and charts Helpful stats, graphics, and this day in history charts are available for your reference. # Interactive maps Interactive maps show precipitation, clouds, pressure, wind around your location stations. Data is available in JSON, XML, or HTML format. **Note**: This sample Swagger file covers the `current` endpoint only from the OpenWeatherMap API. <br/><br/> **Note**: All parameters are optional, but you must select at least one parameter. Calling the API by city ID (using the `id` parameter) will provide the most precise location results. -
Save the file and check the reload in the preview server.
In the preview server, notice how the heading levels are reflected in the sidebar.
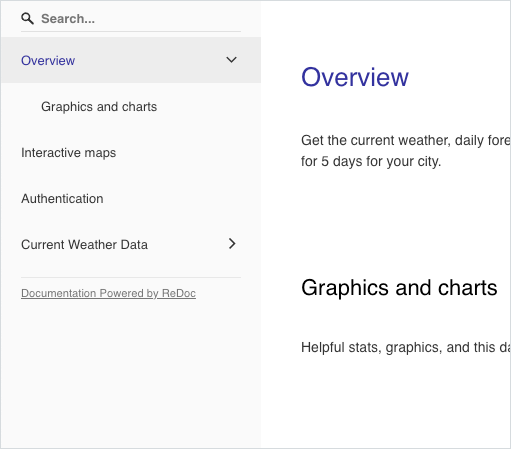
First-level headings become parent-level sidebar entries. Second-level headings become child-level sidebar entries to the parents. (Deeper levels aren’t supported.)
-
You can also re-use some content from your OpenAPI definition. In your description file, add this tag:
<SecurityDefinitions /> -
Save the file and check the reload in the preview server.
The security object from your OpenAPI definition appears directly in your description content.
The pro version lets you embed other tags and also push content into the right menu. We’ll explore that in the next section.
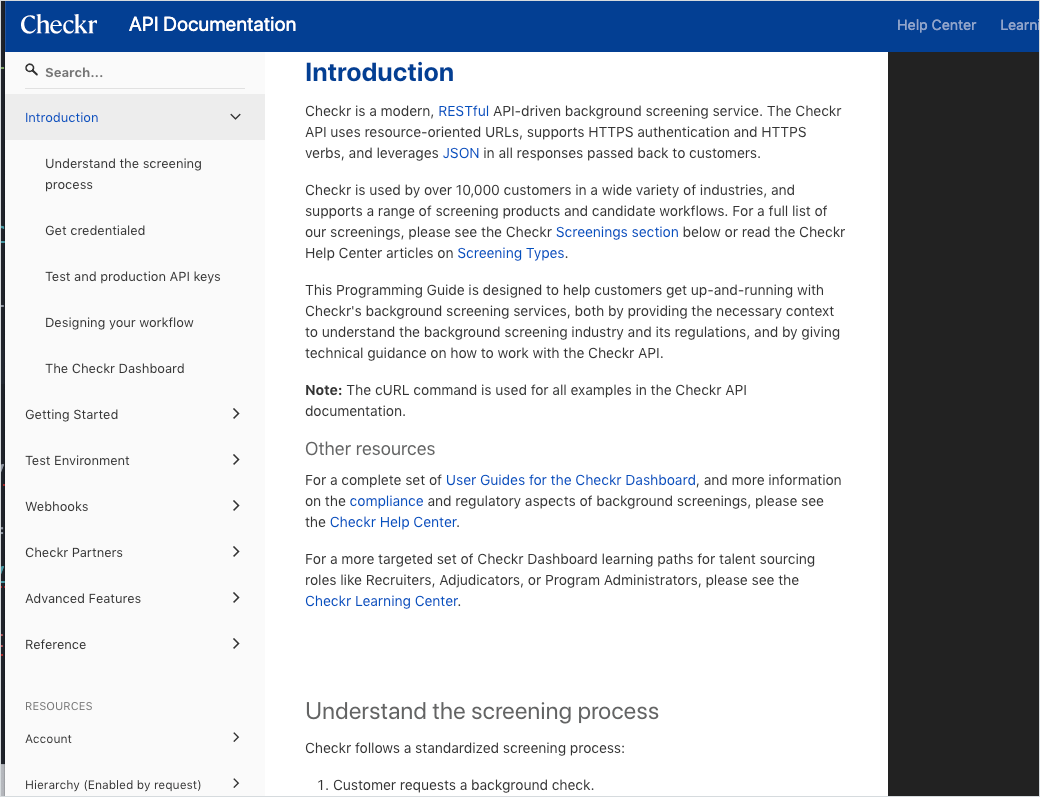
For an example of fairly robust API documentation that uses the sidebar for a lot of conceptual documentation, see the Checkr documentation.
If integrating your conceptual content like this doesn’t work for your doc needs, Redocly offers a more robust option: Redocly Developer Portals. The Redocly Developer Portals use Gatsby as a static site generator to give you more complete control and customization for non-reference content. Gatsby also provides many pre-built React components, which makes building out other features of a developer portal, such as marketing landing pages and other UI elements in a console, much easier.
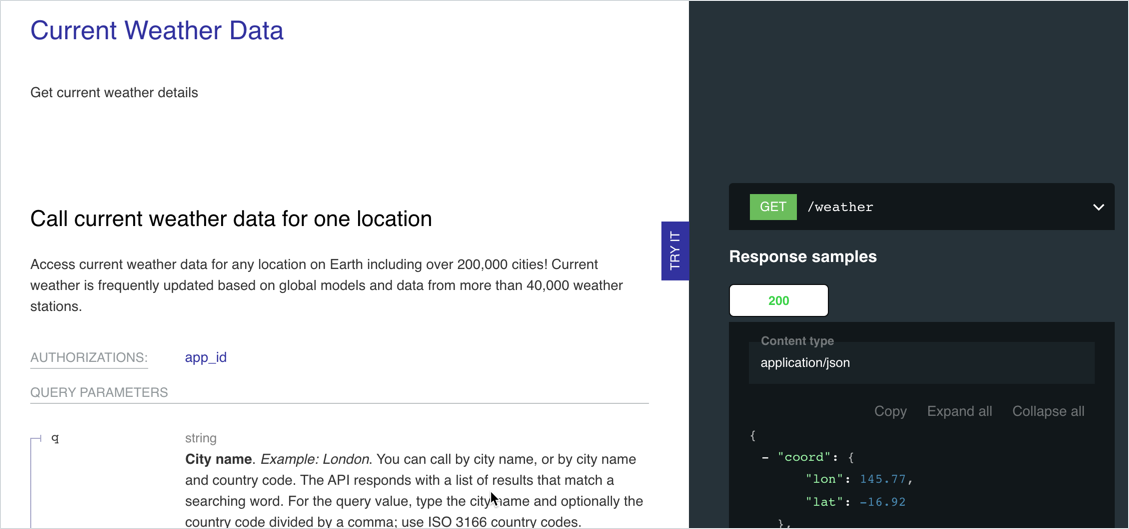
7. Explore the premium version: Redocly API Reference
The lack of the Try-it explorer in the Redoc community edition is a major reason to upgrade to the premium version (Redocly API Reference). As I’ve argued elsewhere in this course, the try-it functionality makes API documentation both interactive and interesting. In this tutorial, we’ve been using the community edition of Redoc. The premium version, called Redocly API Reference, provides several key benefits:
- The Try-it-out explorer. You can execute calls in the browser. This interactivity is what makes REST API docs so powerful and instructive.
- Optimized loading. The output is split into multiple files to render loading more quickly (up to 10x faster).
- Special tags. You can use special tags to pull in content from your reference content (such as your security definition or a response).
- Right pane. You can push code into the right pane so that it appears juxtaposed with the conceptual info in the main column.
- Enhanced search. Search is more comprehensive and detailed, including results for request and response parameters, among other enhancements.
Here’s a short video explaining the top 3 reasons why people choose the pro version:
If you have a license for the pro version, you would generate an API key and then use the openapi login command to unlock the pro features. (The openapi logout command clears the API key, reverting you to the community edition.) Pricing for different versions of Redocly is available on their Pricing page.
Let’s enable the premium version features and see how they work. (You won’t have to purchase anything to explore the features locally.)
- Sign in to Redocly.
- Go to your Redocly profile at https://app.redoc.ly/profile and create a Personal API key. Copy the key.
-
Type the following:
redocly login - When prompted for a password, paste the password into the terminal and press Enter. Then, authorization begins. [Q: Are you prompted for your API key at this point?]
-
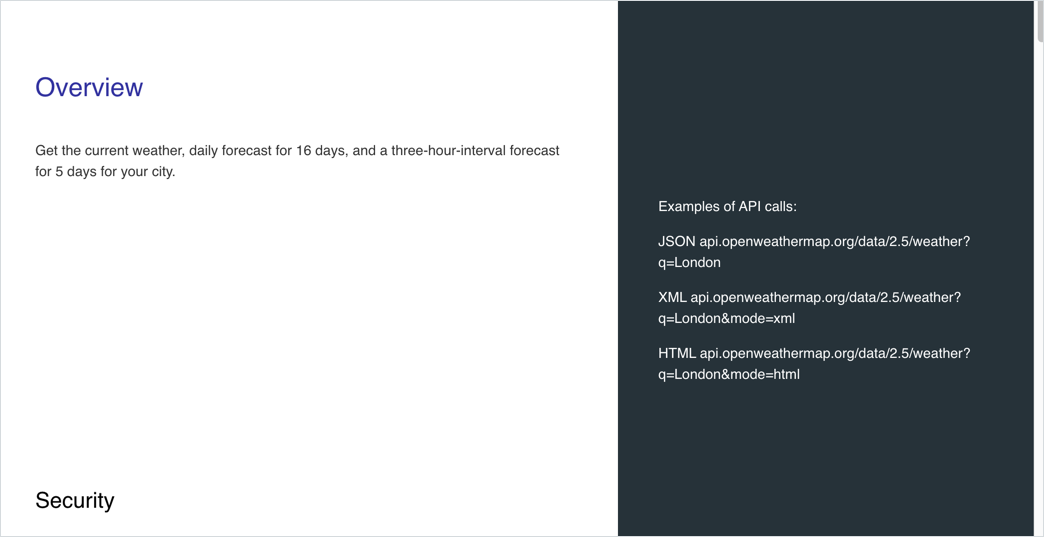
In your
description.mdfile, add somePullRighttags with some sample code, such as the following:<PullRight> Examples of API calls: JSON api.openweathermap.org/data/2.5/weather?q=London XML api.openweathermap.org/data/2.5/weather?q=London&mode=xml HTML api.openweathermap.org/data/2.5/weather?q=London&mode=html </PullRight> -
View the preview server (http://127.0.0.1:8080/) and see the code populate in the right column.
-
In your
description.mdfile, re-use a parameter description from your reference:<RedocResponse pointer={"#/components/parameters/lat"} /> -
View the preview server and see the
latparameter appear (highlighted below).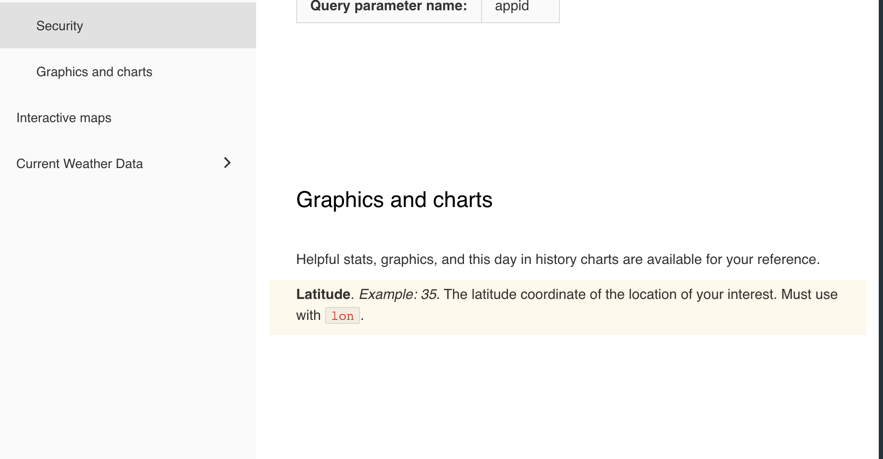
-
Open
.redocly.yamland addshowConsole: trueunderreferenceDocs:referenceDocs: htmlTemplate: ./docs/index.html showConsole: true -
View the preview server and look for the blue “TRY IT” tab next to the weather path:
- Click the TRY IT tab. An API explorer replaces the right pane with options to configure a request.
- For the
zipparameter, enter95050(or another zip code). - Click the Auth (app_id) tab in the upper-right and enter your OpenWeatherMap API key. (If you don’t have one, use
126cac1a482f51de0f1287b45ae2bf9a.) -
Click Send.
A successful response returns JSON such as the following:
{
  "coord": {
    "lon": -121.98,
    "lat": 37.35
  },
  "weather": [
    {
      "id": 711,
      "main": "Smoke",
      "description": "smoke",
      "icon": "50n"
    }
  ],
  "base": "stations",
  "main": {
    "temp": 65.48,
    "feels_like": 62.38,
    "temp_min": 63,
    "temp_max": 68,
    "pressure": 1016,
    "humidity": 68
  },
  "visibility": 10000,
  "wind": {
    "speed": 8.05,
    "deg": 10
  },
  "clouds": {
    "all": 40
  },
  "dt": 1596517361,
  "sys": {
    "type": 1,
    "id": 5845,
    "country": "US",
    "sunrise": 1596460471,
    "sunset": 1596510811
  },
  "timezone": -25200,
  "id": 0,
  "name": "Santa Clara",
  "cod": 200
}
You can learn more about the Try it feature here: The try it API console.
8. Publish the reference output
So far we’ve been exploring the API reference output from within the preview server. Now let’s publish the reference output outside of the preview server:
-
Bundle the OpenAPI definition.
redocly bundle main -o dist.json - Inside a folder called
redoc, create an HTML file calledindex.html. -
In your
index.htmlfile, insert the following template for rendering the OpenAPI definition using Redoc JS delivered through a CDN.<!DOCTYPE html> <html> <head> <title>ReDoc</title> <!-- needed for adaptive design --> <meta charset="utf-8"/> <meta name="viewport" content="width=device-width, initial-scale=1"> <link href="https://fonts.googleapis.com/css?family=Montserrat:300,400,700|Roboto:300,400,700" rel="stylesheet"> <!-- ReDoc doesn't change outer page styles --> <style> body { margin: 0; padding: 0; } </style> </head> <body> <redoc spec-url='http://petstore.swagger.io/v2/swagger.json'></redoc> <script src="https://cdn.jsdelivr.net/npm/redoc@next/bundles/redoc.standalone.js"> </script> </body> </html>If you have a license for the premium version (the Redocly API Reference) and you want the Try-it console enabled, you would use the code described here: Example with “Try It” console enabled in the JavaScript CDN usage (self-hosted) page. However, because we’re just publishing with the community edition version of Redoc, we’ll use the code described in the Redoc GitHub page.
-
Replace
http://petstore.swagger.io/v2/swagger.jsonwith a reference todist.json.<redoc spec-url='dist.json'></redoc> - Drag the
dist.jsonfile generated in step 1 into yourredocfolder so that the reference is valid. - To view the output, you can either upload the files onto a web server, or you can simulate an HTTP server locally. To simulate an HTTP server locally, you can use Python Simple HTTP Server. You can view detailed steps for running this server here: Activity: View local OpenAPI file in Swagger UI. In short, if you already have Python3 installed,
cdto yourredocfolder and run this command:python3 -m http.server. Then browse to porthttp://localhost:8000/and view the Redoc output.
Redoc provides a lot of options to configure the output. Options to configure the community edition of Redoc are here: <redoc> options object. Options to configure the Redocly API Reference version are here: Customization.
For sample API reference docs built with Redoc, see Some Real-life usages on the Redoc GitHub page.
Conclusion
Redoc provides one of the most attractive outputs for REST API docs. In a recent survey about trends in developer documentation, I asked developers “How do you render the OpenAPI specification into documentation?” Although Swagger UI was the most common (used 27% of the time), this is likely because it’s free. The premium version of Swagger (called SwaggerHub) was used only 4% of the time. In contrast, Redoc was used 8% of the time.
Overall, the output from Redoc does seem more polished and user-friendly than other API reference doc outputs. For the interactivity feature alone I would definitely recommend using the premium version (Redocly API Reference) rather than the community edition. Redocly’s CLI-based toolset provides a way to work more efficiently in the code, supporting a docs-as-code workflow. If this command-line-based toolset and three-column output appeal to you, Redoc might be the way to go. You can start a free trial here or learn more here: Redocly.
About Tom Johnson

I'm an API technical writer based in the Seattle area. On this blog, I write about topics related to technical writing and communication — such as software documentation, API documentation, AI, information architecture, content strategy, writing processes, plain language, tech comm careers, and more. Check out my API documentation course if you're looking for more info about documenting APIs. Or see my posts on AI and AI course section for more on the latest in AI and tech comm.
If you're a technical writer and want to keep on top of the latest trends in the tech comm, be sure to subscribe to email updates below. You can also learn more about me or contact me. Finally, note that the opinions I express on my blog are my own points of view, not that of my employer.
45/165 pages complete. Only 120 more pages to go.